These instructions are applicable to the following products:
______________________________________________


DANGER ELECTRICAL SHOCK
Pinball machines have high voltages which can cause DANGER TO LIFE AND LIMB. TURN POWER OFF and UNPLUG PINBALL MACHINE prior to installation. Pinball machines are high voltage and can cause electrical shock.
SAFETY GLASSES are also recommended while working with or installing pinball parts.
Please follow these safety instructions as well as all installation instructions. Failure to follow these instructions may result in damage to the pinball machine, accessory or other parts. Please see our Disclaimer for associated risks and responsibilities (Section 13 in our Terms of Service) prior to installation.
Images included in these instructions are of an installed prototype and may vary from your product slightly.
If you have questions or concerns regarding the proper installation of this part, please contact us for assistance.
When removing screws from the playfield, reinstall by first turning them counter-clockwise to match the original groove in order to respect the integrity of the playfield wood.
General Illumination Bulb
This article covers the generalized installation of the GI. This set of instructions applies to many games, and many of our mods. If you were referred here by an installation article for a specific mod, note that the pictures may look slightly different from your game. Refer to the mod instructions for which bulb location to use (there are many different GI bulbs with different colors).
You may actually use a different GI bulb than the instructions require. However, the replacement bulbs that we send out are white in color. So make sure when you remove a factory bulb to make sure that it is the same color (white). This will not impact play of the game but it will impact the factory lighting on the playfield!
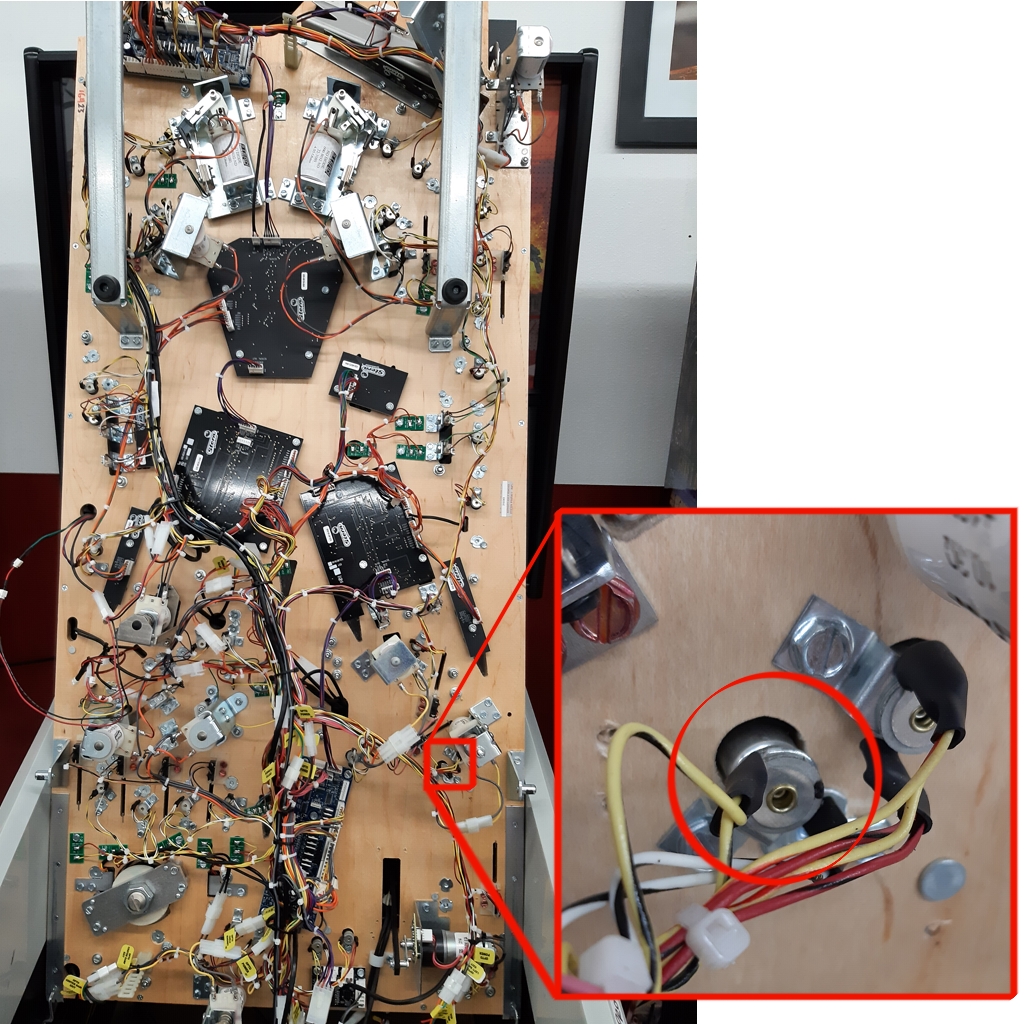
- Locate the GI bulb that applies to your installation. Utilize a hex nut driver to remove the factory bulb. (Note: photo shows replacement bulb already installed).

- Remove the existing bulb by pushing in slightly while twisting and replace with the bulb provided. Push in and twist until it locks into place. You can also adjust the height of the bulbs dome so that it is closer to the top of the bayonet. Reattach the bayonet to the bottom of the playfield.

- Lower the playfield and turn on your games power to test functionality. If some the lights do not function, please see this support article.

- Connect included 6" matrix wire to GI bulb.

- Feed wire under acrylic platform and up through the notch of the hexagon pillar.

- Wrap LOOSLEY with the included black 4" zip tie.

- Using a standard Philips head screwdriver, unscrew the hexagon pillar screw + washer and set aside.

- Peel off the adhesive covering of the double-sided tape underneath the product.

- Position building with screw opening aligned with the hexagon pillar as shown above. Secure on the channel with the double-sided tape.

- Screw in the included replacement screw + washers positioned like above with a standard Philips head screwdriver. The smaller washer is on top of the larger washer.

- Connect the matrix wires.

- Position wire and zip-tie as shown above. Tighten zip-tie and trim excess ends.
Done!

Comments
0 comments
Please sign in to leave a comment.